Saturday, December 31, 2011

Happy New Year!

Just a quick note to wish you a wonderful 2012 full of good times, good friends and, most of all, good food!

To get you off to the right start, here's a dish you might try - it's celebratory and impressive, though not difficult, and just decadent enough.  Thanks to all of you who have continued to tune in throughout the year and check out what's cooking with me.  I appreciate your appetite!

Pasta with Vodka Sauce - adapted from Grace Parisi's Get Saucy
(Makes 6 servings)


A Brief Word on Pasta:  Although vodka sauce is traditionally served with penne, I recommend any pasta that is substantial (ie. not too thin) and pleasing to you - maybe fusilli, gemelli, rigatoni, or even bucatini (pictured), a thick spaghetti-like pasta with a hole running through the middle.  Whatever the variety you choose, make sure you cook it in rapidly boiling, well-salted water (no oil!!), stir frequently, drain promptly, and reserve some of the pasta cooking water to help glue the sauce to the pasta - it makes a big difference!


1 pound (16 oz.) dried pasta

1 teaspoon extra virgin olive oil
4 ounces thickly-sliced pancetta, diced
1/2 onion, minced
3 garlic cloves, minced
1 tablespoon tomato paste
1/4 teaspoon red pepper flakes
Pinch of dried oregano
1/4 cup vodka
One 28-ounce can peeled whole Italian tomatoes, with juice, chopped
1/2 cup heavy cream
1/3 cup frozen green peas, thawed
salt to taste

Bring a large pot of water to a rolling boil, and then salt generously.  Cook pasta according to package instructions.  Drain, reserving some of the cooking liquid, and set aside.

Heat the oil in a large, deep pan over medium-high heat and add pancetta, stirring occasionally until browned and the fat has rendered.  Add the onion, garlic, red pepper, oregano, and tomato paste and stir until softened, about 3 minutes.  Add the vodka and cook until evaporated, scraping up the browned bits stuck to the pan (hooray for pre-cleaning the pot!).  Add the tomatoes and simmer over medium heat until thickened slightly, about 20 minutes.  Add the cream and peas and simmer another 10 minutes.  Season with salt and more red pepper to taste.

If the saucepan is large enough, add the pasta now and reduce heat to low.  If not, transfer both the pasta and the sauce to a clean, large pot, over low heat.  Stir well and add pasta cooking water to thin sauce to your liking.  I like to make it a little too thin at this point, and wait an extra 10 minutes for the liquid to evaporate - this helps the sauce really stick to each piece of pasta.  If you're in a hurry, you can skip this and just serve immediately.  Either way, enjoy with a sprinkling of freshly chopped parsley and a hearty appetite!

Monday, December 5, 2011

'Tis the Season for Gingerbread

Even if you don't celebrate Christmas, don't care for all the sale-shopping, tree-lighting, and sleigh-bells-ringing bunga-bunga, you're still going to want to make this gingerbread and intoxicate your anti-consumerist sensibilities with the heady aroma of cinnamon, nutmeg, allspice, clove and ginger.

DISCLAIMER: Preparing this recipe will put you in the holiday spirit.


Spiced Ginger Cakes (adapted from this post on Roost)
Makes 2 tea loaves or 1 standard loaf


1-1/2 cup oat flour (simply grind rolled oats finely in the food processor)
1 cup brown rice flour (or use wheat flour if you aren't worried about gluten)
1/2 teaspoon salt
1/2 teaspoon baking soda
1-1/2 teaspoon ground cinnamon
1-1/2 teaspoon ground nutmeg
1-1/2 teaspoon ground allspice
1/2 teaspoon ground cloves
4 teaspoons ground ginger
3 eggs
1/2 cup molasses (I highly recommend the Wholesome Sweeteners brand)
1/4 cup maple syrup or honey
1/2 cup melted butter (or your preferred baking oil, ie. coconut)

Preheat oven to 350F degrees and lightly grease your baking pans.

Combine dry ingredients in one bowl and wet ingredients in another.  (Note: wait until melted butter cools to room temp before mixing with eggs.  You don't want scrambled eggs!)  Add wet ingredients to the dry and combine with a few swift strokes.  Immediately pour into loaf pan(s) and bake in preheated oven for 40 minutes, until a toothpick inserted comes out clean.  Remove from oven and allow gingerbread to cool at least an hour before attempting to remove from pan(s).  Can be refrigerated up to 4 days, or frozen up to 3 months.

Sunday, November 27, 2011

Good Ol' Fashioned Tuna Noodle Casserole

Happy Thanksgiving, everyone!  This recipe I'm about to post is about as far from turkey as you can get.  But we're all pretty sick of that stuff by now, right?  Hope you all got your fill of the good stuff this weekend.  Here's a good make-more-to-store weeknight dish, inspired by my cousin Kate's recent blog post which covered the tuna-noodle situation.  Can't go wrong!  I added leeks, mushrooms and nutmeg to give it a nice wintery feel.  And although you don't necessarily need to be as careful as I'm being, I cut back on fat by using skim milk and low-fat cream cheese.  Enjoy!

Tuna Noodle Casserole
Makes 8 servings (6 points each)

8 oz. whole wheat wide noodles
2 tsp. butter
2 leeks, halved lengthwise, cleaned, and sliced thin
1 lb. cremini mushrooms, cleaned, destemmed and chopped
2 medium carrots, diced
2 tablespoons all purpose flour
2 3/4 cups fat free milk
2 tablespoons Dijon mustard
1/2 cup lowfat cream cheese
zest from one lemon
1 teaspoon grated nutmeg
2 5-oz. cans albacore tuna in water, drained and flaked
salt and white pepper to taste
1/2 cup breadcrumbs

Bring a large pot of water to boil.  Add salt and noodles and continue cooking, covered, according to package instructions.  Drain, toss with a bit of pasta water to prevent sticking, and set aside in a large bowl.

Preheat oven to 375F degrees and lightly grease a 2 quart baking dish.

In a large saucepan, melt the butter over medium heat.  Add the leeks, mushrooms, and carrots and cook until slightly softened, about 5 minutes.  Stir in the flour and cook another 1 minute.  Stir in the milk, mustard, cream cheese, lemon zest, and nutmeg.  Stir and simmer 10-15 minutes, until the sauce is thick enough to coat the back of a metal spoon.

Add the sauce and the tuna to the pasta and combine.  Taste and season to your liking with salt and white pepper.  Transfer the mixture to the prepared baking dish and sprinkle the top with the bread crumbs.  Bake for 20-30 minutes, until the contents are bubbling and the top is golden.  Remove from oven and let sit 10 minutes before serving.  Will keep up to 5 days covered in the refrigerator.

Saturday, November 12, 2011

Chicken Tortilla Stew


Before I jump into how to make this delicious stew, I wanted to share a new feature of my blog with you: I'll be including Weight Watchers Points values with each recipe.  Why?  Well, because I'm on Weight Watchers (wasn't that obvious?)  And maybe if I proclaim it to the world, I'll feel accountable to more than just myself for sticking to it.  I tried the diet once before, in high school, and it worked out pretty well, so when my dad decided to give it a shot a few weeks ago, I thought I might revisit the regime and shed some extra pounds I've been carrying around for too long.

Confession concluded, now on with the food!

Chicken Tortilla Stew
makes 8 servings (6 points each)


For steamed chicken:
1.5 pounds boneless, skinless chicken breast (about 4)
2 bay leaves
1 teaspoon black peppercorns
2 dried red chilis (optional)
1 star anise (optional)
Salt
2 tablespoons water

For tortilla strips:
8 corn tortillas (preferably whole grain)
1 tablespoon extra virgin olive oil
Sea salt

For stew:
1 tablespoon extra virgin olive oil
1 medium onion, sliced thin
3 garlic cloves, minced
1 large carrot, chopped
2 fresh jalapeƱo peppers, minced
1/4 cup Chili Powder Blend (see recipe or use store-bought brand of choice)
One 26-ounce box Pomi chopped tomatoes (or a 28-ounce of canned tomatoes)
2 cups water
8 ounces frozen corn kernels, thawed
1.5 cups chopped fresh cilantro
juice from 2 limes
Salt to taste

Cook the chicken: Preheat oven to 350F degrees.  Combine the chicken and spices in a medium baking dish.  Sprinkle with salt, pour water around the chicken (not on top of it) and cover tightly.  Steam in preheated oven for 30 minutes, or until the chicken temperature registers 160F degrees with instant-read thermometer.  Remove to a plate, allow to cool, and shred by hand, discarding spices and any gristle.  Strain cooking juices from baking dish into a small bowl and set aside.

Make the tortilla strips: Slice the tortillas across into thin strips, about 1/4 inch thick.  Slice strips in half lengthwise, so they're about 2 inches long.  Toss with olive oil and salt and spread out on baking sheet lined with parchment paper.  Bake until crispy and slightly golden, about 12 minutes.  Baking time will depend greatly on your oven - a good practice is to check after first 5 minutes, then after every couple of minutes, tossing each time to ensure even cooking.

In a large pot, heat the olive oil and add onions.  Cook over medium-high heat until lightly caramelized, about 15 minutes.  Add garlic, carrot, jalapeƱos, and chili powder and cook another 5 minutes, until vegetables have softened a bit.  Stir in the tomatoes, the reserved chicken cooking juices, and water.  Bring to a boil and lower to a simmer.  Cook with cover another 20 minutes or so.  Stir in the corn, cilantro, and lime juice and season to taste with salt.  Simmer another 5 minutes and serve with tortilla strips on top.

Saturday, November 5, 2011

Adzuki Bean + Winter Squash Stew

Yesterday I visited the Cayuga Organics stand at the Union Square Farmer's Market.  You know, the one that sells beautifully crusted beer bread and has bins and bins of dried heritage beans and grains.  I am always tempted to run my hands through the beans, right up to my elbows.  But I practiced restraint.  It's so hard not to play with your food, isn't it?

I bought a bag of pretty little adzuki beans and cooked up a riff on this recipe, shared on Heidi Swanson's blog 101Cookbooks.com, created by chef Rebecca Stevens - who, it turns out, is a fellow Natural Gourmet Institute grad!  Small world.  It's a great stew, on its own, or served over brown rice.  Pretty economical, too!

Anyway, here's how it goes:

Adzuki Bean + Winter Squash Stew
serves 6 to 8


1 winter squash (i.e. kabocha, acorn, butternut) - about 1-1/2 lbs.
1/2 cup water

1 cup dried adzuki beans, rinsed and picked over for pebbles
5 coins ginger, 1/8-inch thick
1 whole star anise
8 cups cold water

1 tablespoon olive oil
1 small yellow onion, chopped
1 shallot, chopped
1 fennel bulb, diced

salt
red pepper (optional)

Preheat oven to 425F.  Cut squash in half, oil and salt it, and place cut side down in a baking dish with the 1/2 cup water.  Roast until tender, about 45 minutes.  When cool enough to handle, scoop out the cooked squash and set aside.

Meanwhile, place the beans, ginger, star anise, and water in a large soup pot.  Cover, bring to a boil, and simmer until tender, about 1 hour.  Add 1 teaspoon salt.

In a small saucepan, heat the 1 tablespoon olive oil and add the onion, shallot, and fennel, and more salt. Cook covered over low heat until softened, about 10 minutes.

Remove the star anise and ginger from the beans once tender, stir in the vegetables and squash flesh, and continue cooking for another 15 minutes.  Taste and adjust seasoning with more salt to taste.   At this point I also added some red Aleppo pepper (red pepper flakes, or even cayenne, would work here - just be careful!)

Today's Lunch: Steak Salad

Black-pepper crusted 4 oz. sirloin, roasted beets, avocado, mixed greens, pico de gallo, and white wine vinegar.  Delicioso!

Friday, October 28, 2011

It's chilly, so...chili!

Here in NY we've suddenly fallen out of fall and smack into winter.  I'm glad I enjoyed the crisp air and colorful leaves while they lasted.  Today I think Dan and I will have to take the A/C unit out of the window.  We've stubbornly resisted long enough, but summer is officially over.  And denial is not just a river in Egypt.

Just a quick post to share my favorite chili spice blend with you.  Although it may seem like a lot, I typically use the whole recipe amount when I'm preparing a big pot.  The resulting chili, whether it's chili con carne, chili non carne, or whatever form of chili in between, is sure to stand out in flavor.  Just be sure to supplement with enough salt so that all this rich spice really shines!
Chili Powder Blend (adapted from The Joy of Cooking)
makes 1/2 cup

5 tablespoons ground mild chile pepper (such as ancho, pasilla, new mexico, etc.)
2 tablespoons ground cumin
2 tablespoons dried oregano
1 teaspoon ground red pepper (Aleppo is best, cayenne is also good)
1 teaspoon freshly ground black pepper
1/2 teaspoon cinnamon

Combine all ingredients in a small bowl.  Use immediately, or store in an airtight container.

Thursday, October 27, 2011

The Art of Zoz

A quick non-culinary plug to my dear friend, artist Zoe Long.  Check out these incredible shoes she designed for me!  Waterproof permanent ink on white canvas shoes.  So brilliant.  Thank you, Zoe!

Check out Zoe's blog and like the Art of Zoz on Facebook.  This talented lady's going places - check her out!

Wednesday, October 26, 2011

Fall pasta

In my continuing obsession with all things autumn-related, today I took a walk over to the farmer's market in my neighborhood of Astoria to gather seasonal goodies for lunch.  There I found some gorgeous Tuscan kale, and all sorts of squash and apples.  Naturally, I bought more than I could reasonably carry and awkwardly shuffle-shuffled home, cursing myself because I just had to have that huge, round kabocha squash.  Ah well!  Cooking is nothing if not a labor of love.

This is a simple recipe inspired by this recent post from one of the food blogs I follow, Dinner: A Love Story.

Pasta with Kale and Pancetta
6 to 8 servings

1 lb. (whole wheat) pasta (I like fusilli for the way the diced pancetta gets stuck in the curls)

1 tablespoon olive oil
1/4 lb. pancetta, diced
1 garlic clove, minced
1 bunch Tuscan kale, stem ends removed and roughly chopped
good red pepper flakes to taste (I'm obsessed with the Calabrese kind from Buon Italia in Chelsea Market!)
salt to taste

3 oz. crumbled goat cheese

Put up a large pot of water on high heat.  Once it comes to a boil, salt generously and add the pasta.  Cook according to the package instructions.  Drain, reserving at least 2 cups of pasta water.

In a large pan, heat the olive oil over medium-high heat and add the pancetta.  Cook until browned, then add the garlic and cook another minute or so.  Carefully add the kale on top (it will sputter and hiss when the oil meets the water) and let it wilt into the pan.  After the racket dies down, add salt and red pepper flakes, stir, and cook another 3 minutes.  Remove from heat and set aside.

In a large bowl or tray, mix the pasta, kale/pancetta mixture, and the goat cheese.  Toss to allow the heat to melt the goat cheese, if it seems too dry, slowly pour in pasta water to your liking.  Serve hot, with extra red pepper flakes on the side.

Buon Appetito!

Tuesday, October 25, 2011

J'adore Le Creuset

What can't this baby do?

My Le Creuset pot is amazing.  Especially when winter rolls in and I suddenly feel the urge to braise, stew, and make soup.  Those are the definitive modi operandi of good ol' blue here.  So, in the spirit of Le Creuset appreciation, and because delicious autumn weather is now upon us, here's a warm and cozy recipe, introduced to me by my childhood babysitter, CĆ©lia, who has returned to her homeland, where she and this soup were born: Portugal.

Caldo Verde 
Makes about 10 cups

3 tablespoons olive oil
1 yellow onion, chopped
2 garlic cloves, minced
8 cups water
4 medium potatoes, peeled and thinly sliced
salt and black pepper
1 lb. Portuguese linguiƧa
2 cans kidney beans
4 cups shredded kale, chard, or collard leaves, washed and dried
2 tablespoons fresh lemon juice

Heat 2 tablespoons of the olive oil over medium heat.  Add the onion and cook, stirring, until tender but not browned, about 5 minutes.  Add the garlic and cook another minute or so.  Stir in the water, potatoes, and some salt and black pepper.  Bring to a boil, reduce the heat, and simmer until the potatoes are soft, about 20 minutes.  Remove the pot from heat and either use an immersion blender to puree the potatoes into the soup, or transfer carefully, working in batches, to a blender to puree.  Return the soup to the pot.

In a skillet heat the remaining tablespoon of oil and brown the sausage.  Once fully cooked, remove to a board, cool, and thinly slice.  Pour 1 cup of the soup into the skillet and scrape up the browned bits, then return the liquid and browned bits to the soup.  Add the sliced sausage to the soup.

Simmer 5 minutes.  Stir in the kale or other greens and cook another 5 minutes.  Stir in the lemon juice and serve.

Saturday, October 22, 2011

Breakfast: Cornbread

Some weekend mornings, when I have nothing in particular to do, I like to wake and bake.  No, not that kind of baking!  I mean the cannabis-free sort.  This morning I was feeling the cornbread, baked in a piping hot, butter basted cast-iron skillet, served with warm maple syrup and two eggs over easy.  
I used my ol' standby from the Joy of Cooking, because their cornbread recipe is incredibly simple - like, pre-coffee brain-dead simple.  The only change is I like to use honey instead of white sugar.  Maple syrup or molasses would work too, but would yield a different flavor, obviously.

Cornbread 
Makes one 10-inch skillet bread, one 8-inch square bread, or about 15 muffins

DRY:
1-1/4 cups yellow or white cornmeal, stone-ground
3/4 cup all-purpose flour
2-1/2 teaspoons baking powder
3/4 teaspoon sea salt
WET:
2 large eggs, beaten
1 cup milk
3 tablespoons melted butter
3 tablespoons honey

Have all the ingredients at room temperature before you start.  Preheat the oven to 425 degrees F and grease the pan with butter, oil, or bacon drippings.  Place it in the oven until sizzling hot.

In a large bowl, combine all the dry ingredients.  In a separate bowl, whisk the wet ingredients.  Add the wet ingredients to the dry in a few quick strokes (you want to be extra careful not to overmix; only mix until the dry ingredients are wet.  No need to worry about lumps in the batter).  Pour the batter into the hot pan and bake 15 to 18 minutes, until nicely browned.  Serve immediately and store any leftovers in a tightly sealed container.


Wednesday, October 19, 2011

Sweet & Tart (and loving it)

I'd like to introduce you to one of my favorite books, A Fistful of Lentils by Jennifer Felicia Abadi.  People, meet book; book, people.  It's a cookbook, obviously (and can be purchased here).  It reveals the delectable secrets of Syrian-Jewish grandmother cooking, while also giving the reader little glimpses into the history of the author's own family, as told by her grandmother and other elder family members.  It's a fun read, the recipes are straightforward and well-tested, and once you get the hang of the cooking style, with the words of all these relatives swimming around your head, you kinda start to feel like one of the family!


Below is a pretty close interpretation of the book's Dja'jeh Mish Mosh.  My minor changes are the addition of a marinating step with spices for extra oomph, using honey instead of brown sugar, and leaving the dish uncovered for the final 30 minutes of baking.  Otherwise, full credit goes to Ms. Abadi and her Grandma Fritzie.

Sweet and Tart Chicken with Apricots

Recipe adapted from, "A Fistful of Lentils: Syrian-Jewish Recipes From Grandma Fritzie's Kitchen," 
by Jennifer Abadi. (c) 2002, used by permission from The Harvard Common Press.

Serves 4


CHICKEN:
3 pounds chicken pieces (white and/or dark), skinned
1/4 cup kebab spice (or whatever spice blend you prefer; optional)
salt and freshly ground black pepper to taste
2 tablespoons oil

SAUCE:
2 tablespoons oil
2/3 cup coarsely chopped yellow onion
2 teaspoons minced garlic
One 6-ounce can unsalted tomato paste
1-1/4 cups cold water
2 teaspoons Worcestershire sauce (Lea & Perrins is best)
3 tablespoons honey
6 tablespoons fresh lemon juice
salt and freshly ground black pepper to taste
1 tablespoon tamarind paste
1-1/4 cups dried whole Turkish apricots

Preheat the oven to 350 degrees F.

Marinate the chicken: Rinse the chicken pieces under cold running water, pat dry, and sprinkle with spices, salt and pepper and place in a casserole, covered, for 15 minutes to marinate.

Heat the oil in a large skillet over medium-high heat.  When the oil is quite hot, add the chicken pieces, a few at a time, and brown, cooking for 2 to 3 minutes per side.  Repeat with the rest of the chicken and set aside.

Prepare the sauce: Heat the oil in the same skillet over medium heat and cook the onions until golden and soft,  3 to 4 minutes.  Add the garlic and cook, stirring, an additional 1 minute, being careful not to burn it.

Combine the remaining sauce ingredients except the apricots in a  bowl and pour into the skillet with the onions and garlic.  Bring the sauce to a boil over high heat.  Turn off the heat and set aside.

Arrange the chicken pieces snugly in one layer in a roasting pan.  Cover the chicken with the apricots and pour the sauce over the apricots, reserving 1/2 cup for later.  Cover with aluminum foil or a tight lid and bake for 1 hour.

After 1 hour, pour the remaining sauce over the chicken and continue to bake, uncovered, until the chicken is tender and almost falling off the bones, another 30 minutes.  Serve hot over rice or your favorite grain (I like this with freekeh, smoked green wheat.

Tuesday, October 11, 2011

Midweek Munchies: Sauteed Broccoli

Hi Friends!  Sorry to have missed our standing date this past week.  I spent the weekend up in Fairhaven, Mass. paying a visit to the newest addition to the Pogash family, Ben Zen!  He's such a joy.  We were hosted by his lovely parents, Jonathan and Megan, and were wined, dined, and babied to our hearts' content!


Here's a shot of the water from Fort Phoenix.  Gorgeous weather, and just such a beautiful spot.


 Now, back to food-things!  Sometimes I get these insatiable and exclusive cravings for, like, vegetables.  In particular, broccoli.  So tonight this was my dinner (burp):


Of course, Dan the Man can't survive on veggies alone, so I made him a quick skillet dinner of fresh Greek sausage from our local butcher (lamb and leeks, mmm), quartered apples, and halved onions.  A glug of olive oil to start it off, a few sprigs of rosemary to finish it, and that's a wrap, folks!  A big fork salute to the ladies of Canal House Cooking. (There is indeed genius in simplicity.)


Hope you're having a great week!  Bon apetit!


XO

Sunday, October 2, 2011

Sunday Suppers: Chicken Mughlai Curry

Back to the universal meat pleaser: chicken!  Short post today; after working a vegan wedding the past 2 days, I'm feeling pretty taciturn and inactive.  I spent the little energy I had left on this tasty, easy dish.


If you're interested in the recipe, check out Grace Parisi's great book, Get Saucy.  It's a 436-page sauce bible that is a great addition to any well-rounded cookbook collection.

Buen Provecho!

Sunday, September 25, 2011

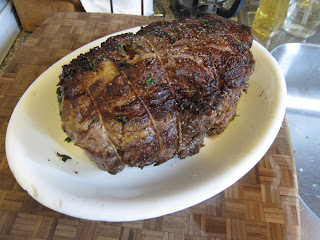
Sunday Suppers: Italian Pot Roast

Hello my peoples.  Crazy how another week has flown by, huh?  Here in New York we had two glorious days of fall, and then it was back to the parallel alter-universe of disgusting, extra-seasonal weather that we've all come to love to hate.  Rain and sweat and yuck.

But let's just pretend, for a brief moment, that we are indeed experiencing a glorious fall day: the weather is crisp, the leaves are turning the landscape into a vibrant watercolor, and we have the undeniable urge to throw on chunky sweaters and sip hot spiced cider.  Mmmm.  This is the ideal weather for a pot roast!

Stracotto means "overcooked," an unfortunately dull and misleading adjective the Italians have used to describe this decadent, melt-in-your-mouth meat dish.  I went to my cooking bible, The Joy of Cooking, for this one and am glad I did.  When it comes to the intersecting planes of soupy, saucy, and meaty, the Rombauer-Becker clan have got you covered.  I only changed one thing, which was the amount of fresh herbs used.  I dialed those way up, since herbs are not only delicious but full of excellent antioxidant properties, good for staving off that autumn chill.


Italian Pot Roast (Stracotto) - adapted from The Joy of Cooking
8 to 10 servings

3 large garlic cloves, minced
1 cup packed parsley leaves, chopped
10 fresh sage leaves, chopped
1/4 cup fresh rosemary, chopped
1/4 cup olive oil
1/2 teaspoon black pepper

1 boneless beef pot roast (4 to 5 pounds)
1 teaspoon salt

 1 onion, chopped
1 carrot, chopped
1 celery rib with leaves, chopped
4 ounces mushrooms, thinly sliced
1 bay leaf

2 1/2 cups dry red wine
2 tablespoons tomato paste
2 cups beef or chicken stock
One 28-ounce can whole tomatoes, drained and crushed

--------------------------------------------------

In a small bowl, mix the garlic and herbs.  Set aside half the mixture and mix the rest with 1 tablespoon of olive oil and the black pepper.  Make about 10 deep slits all over the pot roast and stuff them with the herb and oil mixture.

Heat the remaining 3 tablespoons of olive oil in a large Dutch oven over medium high heat.  Add the roast and brown on all sides, about 20 minutes.  Be careful not to let it scorch.  Remove the roast to a platter and pour off all but 2 tablespoons of the fat.  Sprinkle the roast with salt.

Return the pot to heat and add the onion, carrot, celery, mushrooms, and bay leaf.  Cook until the onion is lightly browned, then add the herb mixture and cook another 30 seconds.  Add 1/2 cup of the wine and the tomato paste, and boil until the pot is almost dry.  Then stir in another 1 cup of wine and 1 cup of stock.  Reduce to less than 1/2 cup.  Finally, add the roast back to the pot, along with the rest of the wine and stock, and the crushed tomatoes.

Bring to a gentle simmer and cover the pot. Reduce the heat to the lowest setting so that the liquid barely simmers and cook for 2.5 hours.  Turn the meat every 30 minutes or so.  When the roast is tender, move it to a platter and cover with foil to keep warm.  Skim off any fat from the sauce and take out the bay leaf.  Taste and adjust seasonings.  If the sauce seems too thin, boil it down for a few minutes until it reaches the desired consistency.  Slice the meat about 1/4 inch thick and serve it with the sauce.

Sunday, September 18, 2011

Sunday Suppers: Chicken Tetrazzini


For our make-more-to-store meal this week, I was looking to do a big, hearty chicken-noodle situation, and after numerous searches it became clear that the best bet for a rib-sticking casserole would be a dish named after the Italian opera star, Luisa Tetrazzini, for whom this was created circa 1910, legend has it, at the Knickerbocker Hotel in NYC.  Sweet!

There is no universal standard for this dish, but all recipes out there agree on a few general parameters: non-red meat (i.e. chicken), mushrooms, butter, cream, Parmesan, sherry or wine, and noodles.  My version is a slightly healthier version, with milk instead of cream and minimal cheese.  Even still, the aromas emanating from your oven will be as rich and palatable as a Puccini aria!

Chicken Tetrazzini (printable recipe)
serves 6

a 4-pound chicken, cut into 8 pieces
3 celery stalks, with the leaves
2 medium carrots, peeled and cut into large chunks
1 large Spanish onion, peeled and halved
1/2 bunch thyme

1/2 pound broad egg noodles

5 tablespoons (2.5 ounces) unsalted butter
8 ounces mushrooms, destemmed and sliced thin
2 tablespoons all-purpose flour
1/4 cup Sherry
1 cup cream/milk
freshly grated nutmeg
salt and black pepper to taste
1/3 cup grated Parmesan

---------------------------------------------------------------------------------------------------------

Prepare the chicken: Combine the chicken, celery, carrot, half of the onion, and the thyme in a large pot with enough water to cover it by 2 inches, and bring to a boil.  Salt generously, and reduce heat and simmer for 20 to 25 minutes, until the chicken is tender.  Remove the meat from the broth and let it cool on a plate.  Separate the meat from the skin and bones, returning the skin and bones to the broth, and shred the meat into small pieces, reserving it.  Simmer the broth until it is reduced by half, then strain it, discard the solids and skim the fat, and boil the broth until reduced to about 2 cups.

While the broth reduces, cook the noodles in a kettle of well-salted boiling water until just al dente and drain well, reserving a cup of the pasta water.

Prepare the sauce: Chop the remaining half onion.  Melt the butter over medium heat and add the chopped onion and sliced mushrooms.  Cook until softened, about 5 minutes.  Sprinkle in flour, mix well, and cook about 2 minutes longer.  Add sherry and turn heat to medium-high to burn off the alcohol.  Stir in the reduced broth, milk and nutmeg, and simmer until slightly thickened.  Season with salt and pepper to taste. (Warning: your broth will already be well-salted, so don't go crazy.  Generous pepper is recommended, though.)

Assemble the dish:  Preheat the oven to 350 and oil a 3-quart casserole dish.  In a large bowl, toss together the chicken, noodles, and sauce.  If the mixture seems too dry, add a little reserved pasta water, just a splash at a time, to your liking.  Turn the mixture out into the prepared dish and sprinkle the top with the Parmesan.  Bake in the center of the oven for 25 to 30 minutes, until the top is slightly golden.

Tuesday, September 13, 2011

Midweek Munchies: Maple-Chili Peanuts

I've had the same half-empty (or is it half-full?  I guess it depends on where you fall on the optimism spectrum.) bag of peanuts sitting in my refrigerator since I used them to make a peanut sauce in the spring, and tonight I decided to finally do something with them.  See, I'm a bit of a compulsive cleaner.  So if something has overstayed its welcome in my fridge (or closet, desk drawer, etc.), it's time to either make use of it or give it the boot.  Luckily for these peanuts, I was feeling generous tonight and so I saved them from a sad and certain death at the bottom of the trash bin.

I think this preparation would work great with other nuts (or mixed nuts, if you're fancy fancy like that), so don't feel you must limit yourself to peanuts.  There's a whole variety of nuts out there in the world - and how!

Maple-Chili Roasted Peanuts
(makes 2 cups)


2 cups (8 ounces) shelled peanut halves
2 tablespoons butter, melted
3 tablespoons maple syrup
1 teaspoon crushed red pepper flakes (or to taste)
salt to taste

Preheat the oven to 350 degrees.  Toss ingredients until the peanuts are evenly coated and spread in an even layer on a parchment-lined baking sheet.  Bake until lightly browned, about 12 minutes.  Let cool before serving or storing in an airtight container.

Sunday, September 11, 2011

Sunday Suppers


Hey people, I'm baaaaaaack...

Sorry for the nearly summer-long hiatus.  I guess even though Dan and I didn't take a honeymoon per se (that comes later - Thailand in January!), we kind of checked out of the universe for a time.  But now Dan's back to school, and I'm back to reality, so let's get cooking!


Since Dan is taking pre-med classes mainly in the evenings, I've been strategizing ways to keep him nourished and away from the automatic takeout loop.  The answer, I'm finding, is in casseroles.  Big hearty dishes that I can make in bulk on Sundays, to be reheated at a moment's notice and last the whole week long.  So I'm hereby instituting a new series on the blog, which we'll call Sunday Suppers.  How bout it?  Maybe this will finally slap me into a steady cooking routine, something I've fallen off the wagon with in the past, say, two years.  That's what happens when you cook for a living, I guess.  Hmm...

A few words about this recipe: You can most definitely make them using the more traditional ricotta filling if you'd prefer, but I went the cottage cheese route because, a) it's much easier to find tasty cottage cheese than it is to find good quality ricotta (Polly-O, O no!), and b) it's packed with double the protein, making this much more filling without all that extra fat.  Great for those long nights in the chem lab (for example).


Meaty Stuffed Shells adapted from recipe by Heidi Swanson
(serves 6 to 8)

zest of one lemon

Sauce:
1/2 pound ground meat (beef, turkey, or a beef/pork/veal blend, all good choices)
1 1/2 teaspoons crushed red pepper flakes (Calabrese is the best, if you can find it)
4 garlic cloves, finely chopped
1 28-ounce can crushed tomatoes
1 14-ounce can crushed tomatoes
1 tablespoons dried oregano
salt and freshly ground black pepper

Filling:
1 16-ounce container 4% milkfat cottage cheese
1 egg, beaten
1 cup (about 5 oz.) grated mozzarella
1 bunch chives, finely chopped
large pinch of salt

25-30 jumbo pasta shells (Ronzoni makes nice ones)

-----------------------------------------------------------------------------------------------------------

Oil a 13 x 9 inch (or equivalent) 3 quart baking dish and sprinkle with half the lemon zest.  Put up a big pot of pasta water to boil and preheat the oven to 350 degrees.

To make the sauce, heat a saucepan over high heat and add the meat.  Break up with a spoon as it browns and cook until no longer pink.  Add the red pepper flakes, garlic, and some salt, and cook another minute or so.  Add in the tomatoes and oregano, lower to medium, and cook covered about 5 minutes.  Remove from heat, taste and season with salt and pepper to your liking.

To make the filling, combine the cottage cheese, egg and some salt in a bowl.  Mix well until smooth and combined, then stir in 1/2 of the mozzarella, 3/4 of the chives, and the rest of the lemon zest.

Cook the shells according to the box instructions in salted water until al dente.  Be careful not to overcook or the shells will fall apart as you fill them.  Drain and let cool until you can comfortably handle them.

Spread 1/3 of the sauce across the bottom of the baking dish.  Fill each shell with the cheese filling, arranging them in a single layer across the dish.  Ladle the remaining sauce over the shells and sprinkle with the rest of the mozzarella cheese.  Cover with foil and bake for 30 minutes, then another 15 minutes uncovered.  Sprinkle with the remaining chives and serve hot.

Print the recipe

Thursday, July 28, 2011

Sunshine-flavored Ice Cream

Haven't done an ice cream posting yet this summer, so here we go, inaugural 2011 ice cream batch!

As always, I've turned to David Lebovitz's fabulously well-researched, well-written ice cream bible, The Perfect Scoop, to guide me through my surplus of fresh apricots from Red Jacket Orchards.  The cream is from Ronnybrook Dairy.  And the main ingredient is sunshine! (My only contribution to the recipe is the white port, which is optional but delicious.)

Fresh Apricot Ice Cream (adapted from David Lebovitz's recipe)
Makes about 1 quart

1 pound ripe fresh apricots (10 to 16, depending on size)
1/2 cup water
1/2 cup sugar
1 cup heavy cream
3 drops almond extract
A few drops freshly squeezed lemon juice
1 teaspoon white port (optional)

Slice open the apricots and remove the pits, then quarter each half.  Cook the apricot pieces with the water in a covered medium, nonreactive saucepan over medium heat until tender, about 8 minutes, stirring occasionally.  Remove from heat and stir in the sugar until dissolved.  Let cool to room temperature.

Once cool, puree the apricots with all the liquid in a blender or food processor until totally smooth.  Blend in the cream, almond extract, lemon juice, and port (if using).

Chill the mixture completely in the refrigerator, then churn in your ice cream maker according to the instructions.  Serve topped with whipped cream and chopped pistachios.

Thursday, July 21, 2011

Dog Days of Summer (and the grilling's easy)

Hey friends!

For those of you on the northeastern seaboard today, how ya holding up?  Hot enough?  It's a real scorcher, and it's supposed to only get hotter.  So do what I do: stay in the AC, remain pantsless for as long as you can, and sip on some ice cold minty lemon sun tea.

It's so hot, I bet you could grill a cheese sandwich on the pavement...

Oh snap, lame segue!  Well, here's what I had for lunch today: Grilled ham and swiss on 7-grain with red pepper spread and sweet cream butter.  Mmmmmmm...


What did you have for lunch?  I hope it was filling and delicious.  Until next time, stay cool, kiddos!

Sunday, June 26, 2011

Free-Range Cooking

What a full weekend it's been!  It began with a BBQ dinner party, ended with a farmer's market cook-off, and included my niece's 6th birthday party, a pasta class full of Mormons, and the legalization of gay marriage in New York!  Boo-ya!!

Here's a taste of what went on:

Today was a gorgeous day at the Jackson Heights farmer's market, where you can really tell that summer is in full swing.  From the sour cherries that have just cropped up, to the tomatoes, lettuces, zucchini, and peas, it's all there, ripe for the picking.  I was one of three chefs taking part in a pea-themed cooking demo, co-sponsored by Greenmarket and the Queens Harvest Food Co-op.  We handed out samples of sauteed peas with mushrooms and shallots, a raw snap-pea salad with mint and radishes, and (my creation) a snow pea and potato curry.  We had a great turn out and I'm looking forward to helping out with more outdoor cooking demos as the summer progresses!  Here's a recipe for what I contributed:


Snow Pea and Potato Curry (printable version)
(serves 4)
2 tablespoons oil or butter

2 garlic scapes or 2 cloves garlic, chopped
1 knob of ginger, peeled and minced
1 tablespoon mild curry powder
1/2 teaspoon cayenne
4 medium red-skin potatoes, peeled and diced small
1/4 cup water
1 pound snow peas, washed, trimmed, and roughly chopped
1 cup cilantro leaves, washed and roughly chopped
salt to taste

Heat the oil or butter in a skillet over medium-high heat.  Add the garlic, ginger, and spices and cook about 3 minutes, being careful not to burn.  

Add the diced potato and water and a generous pinch of salt, and bring to a boil.  Simmer for about 5 minutes, until the potatoes are tender.  If all the water evaporates before the potatoes are cooked, add more a tablespoon at a time.

Stir in the snow peas and cilantro, and return heat to high for another 1-2 minutes of cooking.  Season with more salt to taste and serve immediately.

On Friday, I decided to serve the BBQ pulled pork I made with some homemade buns, and here's how I did it:

the Kitchen Aid is key
Dough after it's doubled in size
Before baking
After baking

Burger Buns - from the King Arthur Flour recipe
(makes 8 large buns)

6 to 8 ounces lukewarm water
1 ounce butter
1 large egg
14 3/4 ounces all-purpose flour
1 3/4 ounces sugar
1 1/4 teaspoon salt
1 tablespoon instant yeast

*note: to get the best results, use the smaller amount of water in the summer and the larger amount in the winter.


Preheat the oven to 375 degrees.  Mix and knead all of the ingredients, either by hand, in a mixer, or in a food processor, until a smooth, soft dough forms.  Cover and let it rise for 1 to 2 hours, till doubled in size.

Gently deflate the dough and divide it into 8 even pieces.  Shape each piece into a round ball and flatten to about 3" across.  Put the buns on a lightly greased or parchment-lined baking sheet and cover and rise for about an hour, till puffed up.

Brush the buns with melted butter and bake for 15 to 18 minutes, till golden.  Remove from the oven and brush with more butter to give them a satiny sheen.  Cool on a rack.

Wednesday, June 15, 2011

A non-culinary aside: Rooftop farming, or why I need to get out more

It's a farm, on a rooftop, in NYC!
But first a preamble to this digression: People, I've been busy.  And, sadly, it's been a few weeks since I've cooked a real meal in my own kitchen.  Sure, I've made meals for my client.  I've taught groups of people how to make chicken cacciatore.  I've even been sous chef for a wedding of 120+.  But have I managed to get a single recipe up here since the 1st of June?  Negative.  (Oh, I'm also planning my own wedding.  Just one month to go - jeepers!)

Whenever I find myself clambering to do too many things with the short amount of time I have at home, I try to tell myself, "Eve, you have time.  There is always time."  But, inevitably, that "time" turns into a cranky husband-to-be begging me to please, get off the computer and come to bed, for the fraking love of god! 

The revelatory lesson beneath all this blabber?  Multi-tasking doesn't work.  Kapow!  So instead of letting all these infuriating to-do lists faff about the inside of my fishbowl brain, I head outside on my bike and let it take me away, to new and exciting places, such as:

Brooklyn Grange, the rooftop farm down the block!


I heard from a friend that a community organization called Food Systems Network NYC was organizing a tour of and panel discussion at the Brooklyn Grange Farm.  Myself and a group of about 40 other people met yesterday in the lobby of a huge prewar factory building in Long Island City, Queens, and rode the freight elevator up 5 floors, then walked the final flight, to the one-acre rooftop farm at the top.  Not only were the views breathtaking (as you can see), so was the breadth and diversity of the produce perched atop this urban jungle.  What a crazy, inspiring concept!

After Ben Flanner, the head farmer, introduced us to his planties (everything from herbs to lettuces to squash to chiles), his bees, and his chickens, we headed back downstairs to an expansive, empty room where a long table was set up in front of a few rows of chairs.  We took a seat and proceeded to learn all about the many challenges and possibilities surrounding this new and exciting quest to farm the rooftops of NYC.  Brooklyn Grange has truly been a pioneer in its mission to close the gap (in terms of both distance and privilege) between people and their food.

Some key take-aways from the discussion:

  • Although it is a substantial investment, from a purely operational standpoint, starting a rooftop farm is not as complicated as one might think.  Essentially, anyone can do it, which is what makes it such a compelling solution to the problem of increasing food scarcity in urban settings.
  • It's the financial aspect that is the main challenge (even more so than hauling tons of soil up to a roof!).  Although NYC has instituted generous incentives for developers to "green" rooftops - meaning covering them with non-edible plants in order to insulate the building and reduce energy consumption - the legislation passed never accounted for the possibility that rooftop farming would take off to the extent that it has.  The incentive, which allows for a $450/sq. ft. tax break, up to $100,000, is nowhere near enough of a leg-up for those who would want to start an urban farm.  Therefore, even though it's a no-brainer to reap the benefits of a green roof while at the same time growing local, sustainable produce for those who live under it, our city legislators have had their heads too far up their bureaucracy to realize it.  
  • Until now: currently, there is a big debate going down among City council-members over whether it would be best to broaden the existing language to aid in the creation of more urban rooftop farms, or to craft an entirely separate piece of legislation to cover this newer iteration of the term "green roof."
And I learned much, much more regarding the nitty-gritty logistics of starting up and running such an operation.  But rather than hearing it from me, wouldn't it me more interesting to just go visit?!  Drop by every Wednesday, from 2pm to 7pm, to pick up some farm-fresh produce and sneak a peak upstairs.

Hey, chicken!

Wednesday, June 1, 2011

Bonjour summer!

I'm incredibly excited about the onset of summer.  Sure, summer means there is no cooking without sweating - and, if you're me, there's no cooking with pants - but it also portends that a sumptuous bounty of amazing produce will explode into NYC from all the surrounding farmlands.  And that's sweeeeet.

For the past couple of months, I've been working as one of the managers at the 79th Street farmers market on the Upper West Side, and it's become more and more clear to me that supermarket produce just is not real.  I'm sorry, but have you ever placed a tiny, candy-red, freshly-picked strawberry next to a gigantic, bleached-out, water-logged supermarket strawberry?  In this particular case, bigger is not better, and the producers of these monstrosities should be ashamed!

But let's not blame it on the agro-giants, evil as they may be.  Let's take matters into our own hands, buy local produce, and vote with our dollar.  Hell yeah!

Ok, that's all for the rant.  Here's what I had for lunch:


Mediterranean Orzo & Chickpea Salad (printable version)
(serves 3-4)

1 cup cooked chickpeas
1 cup cook whole wheat orzo
1 green cucumber, peeled and diced
1/2 cup grape tomatoes, quartered
2 scallions, trimmed and sliced thin
1/3 cup fresh mint leaves, chopped
zest and juice of 1 lemon
1/4 cup extra virgin olive oil
salt & pepper
feta cheese (optional)

In a large bowl, combine the chickpeas, orzo, cucumber, tomatoes, scallion, and mint.  Using a microplane or fine grater, zest the skin off of the lemon (clean it well first, and be careful not to zest the white pith - it can be bitter), then juice the lemon into the bowl.  Add the olive oil, season with salt and pepper, and toss well. Crumble cheese on top, if using.  Let chill at least 30 minutes before serving, so the flavors can marinate.

* Note: Oil-cured black olives would make a nice addition here.  And canned tuna also works in place of the chickpeas, for a non-vegetarian version.

Tuesday, May 17, 2011

Chewy, gooey good stuff

As some of you may know, my twin bro Paul just started hiking the Pacific Crest Trail ("PCT") that runs up through California from the border of Mexico to the border of British Columbia, Canada.  It's a pretty big undertaking, and so far he's rocking it!  He started a blog that he's updating along the way, which you can find here.  Check it out!

These bars will hopefully serve as worthy fuel for Paul while on the trail:


Chewy Fruit & Nut Bars (printable version)
(makes 16)

1/3 cup chopped almonds
1/3 cup chopped walnuts
1/2 cup honey
3/4 cup Medjool dates, pitted
1 teaspoon ground cinnamon
2-1/2 cups old-fashioned rolled oats
1/2 cup chopped dried apricots
1/2 cup dark chocolate chips

Preheat the oven to 375 degrees.  Spread the nuts on a baking sheet and toast until golden and fragrant, 8-10 minutes

Warm the honey until it has the consistency of thin syrup.  In a food processor pulse the honey, dates, cinnamon and oats until everything is coarsely chopped.

Scrape the oat mixture into a medium bowl and break up any clumps of dates.  Stir in the nuts, apricots and chocolate chips.  Squeeze the mixture into a ball.  Line an 11 by 7 inch glass baking dish (or something of similar volume) with parchment paper and lightly grease.  Using wet hands, pat the mixture firmly into the baking dish in the shape of a rectangle.

Freeze until the rectangle is firm enough to cut, about 30 minutes.  Turn out onto a cutting board and cut into 16 bars (2 by 8).  Wrap the bars individually and let stand at least a day (they get chewier as they sit).  These keep well, either at room temp, refrigerated, or frozen.