Friday, November 5, 2010

When life gives you leftover rice, make rice balls!

In my opinion, there are two types of cooks: the kind that follow recipes to the letter and produce flawless food every time, and the kind that employ their creativity (and hopefully common sense) to draw outside the lines of recipes and invent completely new dishes in the process.  I consider myself among the latter category.  I'm not one to abide by the rules of a recipe (BO-ring!).  

So, since I choose to cook in this flexible way, I often find it easy to make use of my leftovers.  "And here I am!" says the newborn rice ball.


 This is less of a formal recipe and more of a guideline that goes as follows:
- For each cup of leftover rice (or other grain - I also had whole wheat berries) mix in one beaten egg.
- Add spices, herbs, seasoning, or a whole other leftover dish - I added black lentil hummus here.
- Preheat your oven to 425 degrees F and line a baking sheet with parchment paper.  Oil lightly.
- Form one-tablespoon sized balls of rice mixture with your hands and space out evenly on the baking sheet.  You should be able to fit 5 rows of 6, for a total of 30 rice balls.
- Bake for about 20 minutes, longer if needed, making sure each rice ball is golden and crispy on the outside.  Remove to a serving dish and enjoy as a low-cost, highly-tasty appetizer!

Friday, October 29, 2010

First you get a chicken...

Admit it, there's nothing better than a roast chicken. As my bro Paul said to me yesterday, it's on par with doing laundry as far as simple satisfactions go. Let me explain: you get your little chicken load ready, you fire up the oven, pop it in, and in one scant hour, PRESTO, you've got delicious chicken meat for days.

So, yesterday I believe I made the best roast chicken of my life. It's perfectly moist, with a crisp, salty browned skin, and a delectably sweet aroma due to the bed of sweet Vidalia onions I cooked it over. And I can't stress enough the role that tons of garlic and herbs plays in producing the most perfect of chickens. I crammed as much thyme and peeled garlic cloves in there as I possibly could (pardon me, dear chicken). And then I trussed the legs together with kitchen twine so that nary a drop of delicious chicken juice could escape from that herbaceous cavity! Mwa-ha-ha!

Here's how it's done, people:

Best Roast Chicken
(makes 4-6 servings)

One 3- to 4- pound organic chicken
Kosher salt and fresh ground pepper
1 bunch thyme
4 garlic cloves, peeled
1-2 tablespoons extra virgin olive oil
1 large Vidalia onion, cut into chunks
1 lemon, quartered
1/4 cup dry sherry

1. Preheat the oven to 450 degrees F. Rinse the chicken and pat it dry, inside and out, so as not to risk steaming it.
2. Salt and pepper the cavity, then stuff it with herb and garlic. Truss the chicken by tying the ends of the drumsticks together over the main cavity, close to the breasts (see photo). This helps keep the breasts from drying out and also allows the bird to cook more evenly.
3. Next, give the bird a fine, even coating of salt. Not just a sprinkle or a pinch, but a visible crust. Season with pepper and brush all over with the olive oil.
4. Put the chicken in a roasting pan or oven-proof saute pan and surround it with the onions and lemon. Place in the center of the preheated oven. Roast it for 50 to 60 minutes, without opening the oven to baste or steal a peek, until a thermometer inserting into the thigh reads 160 degrees F and the juice runs clear.
5. Remove it from the oven and baste it with the rendered juices. Let it rest 15 minutes before carving and serving.
6. While the chicken rests, strain the pan juices, reserving the onions, and skim off the fat. Put into a small saucepan with the sherry, and heat over medium-high until the sauce reduces somewhat, about 5 minutes. Pour over the bird and serve with the reserved onions.

Sunday, October 3, 2010

Autumn breezes, rooftop farms, pickled peppers

Today Kat and I paid a visit to Roberta's in Bushwick, a wonderful spot where you can chomp down on a variety of delicious, perfectly charred pizzas such as the Beastmaster, a genius invention topped with tomato, mozzarella, gorgonzola, Berkshire pork sausage, red onion, capers, and jalapenos. Like, whoa.

It's also a place to explore the great urban outdoors, where basil grows in bathtubs and old shipping containers house local radio stations. Outside the Roberta's complex, every Sunday (just my luck!), Brooklyn Grange -- a 1-acre rooftop farm launched in Queens in collaboration with Roberta's -- sells their goods, and how good they are! Today I bought 5 hot Hungarian peppers and brought them home for the pickling treatment. Stuffed into a recycled jar with cumin, thyme, garlic, black peppercorns, and of course the requisite sugar/salt/water solution, these are sure to be spicy and delicious little sandwich toppers for the winter months to come.


The below recipe can be used on all sorts of veggies, not just peppers, and I encourage you to play around with different spices and herbs - cause it's pretty hard to make a bad pickle!

Pickled Peppers
(fills one pint jar)

2 cups water
1-1/2 tablespoons kosher salt
1/2 tablespoon sugar
5 black peppercorns
1 garlic clove
1 teaspoon cumin seeds
4 sprigs thyme
5 small Hungarian peppers, destemmed and sliced

1. In a medium saucepan, heat the water, salt, sugar, peppercorns, and garlic until it comes to a boil. Shut off the heat and leave covered until ready to use.

2. Thoroughly wash a pint-size glass jar and fill with the cumin, thyme and pepper slices. Pack in tightly, leaving a bit of room at the top of the jar.

3. Pour the pickling solution, with all the solids, into the jar, filling to the very top. Screw on lid tightly and leave on the counter until cooled to room temperature. Store in the refrigerator up to two weeks.


Tuesday, August 10, 2010

Grilling bonanza!

This weekend was a lovely excuse to steal away to the country and hijack my parents' patio BBQ for some grilling gratification. The menu was:


Grilled zucchini rolls with herbed goat cheese
Local tomatoes with mozzarella and fresh basil
Sweet corn on the cob
Rosemary & Dijon grilled butterflied leg of lamb
Grilled summer peaches with vanilla bean ice cream


You can survey the spoils below. The last image is of a leftover salad I made the following day, with corn, tomato, basil, crispy bacon, red wine vinegar, extra virgin olive oil, cayenne, salt & pepper. So sweet and zippy, I highly recommend this combination!


Monday, July 26, 2010

A Serious Food Opera

Disclaimer: Any resemblance that the following scenes might have to objective reality is entirely circumstantial. Summer heat and humidity have been known to cause extreme thirst, hunger, depravity, and utter insanity. Thank you.


This is my sous chef. He's da boss.

He's usually pretty tame, but when he's overheated and hungry, he tends to become mildly delusional, and completely bonkers.
Oh, and this is me, your loyal chef. On corn.

Kids, corn is dangerous. Never say I didn't warn you.

It's even more dangerous than beer.

Anyway, we devoured all our food like ravenous, carnivorous bunnies...

...and still had room for dessert: homemade strawberry frozen yogurt (see recipe below)

Real Strawberry Frozen Yogurt - adapted from The Perfect Scoop, by David Lebovitz
(makes about 1 quart)

- 1 lb. organic fresh strawberries, rinsed and hulled
- 2/3 cup sugar
- 2 teaspoons vodka
- 1 cup plain (whole-milk or low-fat) yogurt

Slice the berries into small pieces and toss in a large bowl with the sugar and vodka. Stir until the sugar begins to dissolve and let stand covered at room temp for 1 hour, stirring occasionally.

Puree the macerated strawberries and the resulting liquid with the yogurt in a blender or food processor until totally smooth. If you want to remove the seeds, press the mixture through a fine mesh strainer.

Refrigerate for at least 1 hour and then freeze in your ice cream maker according to the machine's instructions.

** Cool addition: Boil down 1/2 cup good balsamic vinegar until reduced to 2 tablespoons. Cool completely. When the frozen yogurt is done, spoon in the balsamic reduction and continue churning for just a few more seconds (as in, 3 to 5) to swirl, then stop and transfer frozen yogurt to a container, and freeze before serving.

Saturday, July 24, 2010

The cook's dilemma

Greetings, all! I've been supremely MIA for the past month, which I can only attribute to my infrequent employment and resulting frazzled nerves. I had a dangerous thought, not a few days ago, which was this: Do I even want to be a cook?? (Holy moley, did I really just say that out loud?!) Yes, it's true. The fact is, cooking is a labor of love, and sometimes the love just isn't there, especially when the pay is small, or absent, the hours are miserable, and I let those devious doubts slip in through the back door.
But folks, I'm happy to say that I'm back!! (at least, for now) I'll keep you posted on the developing job situation, but what's more important at this moment is that I've reclaimed my love for cooking and I want to share it with you all. That's a sure sign of a happy, mentally stable Evie.
Tonight I'm making potato and chorizo tacos with avocado-tomatillo salsa. Mexican food is one of my passions, but it often clashes with my locavore bent (Do avocados grow in NY? Noooo.) However, today my conflicting interests in Mexican food and local food found a middle ground when I discovered beautiful tomatillos and serrano chiles at the Union Square Greenmarket! They hail from the Oak Grove Plantation, in Hunterdon County, NJ, not far from my hometown. Who'd o' thunk? Vamonos...

Potato-Chorizo Tacos with Avocado-Tomatillo Salsa

- 1 lb. ground meat (I did half sirloin, half pork)
- 1 tbsp. kosher salt
- 2 tbsp. red wine vinegar
- 2 tbsp. chile powder/any desired spice mix (I actually used my homemade Ras el Hanout)
- 1 tbsp. paprika (I used smoked paprika, but normal sweet/Hungarian works too)
- 2 cloves minced garlic

-1 lb. small white potatoes, cut into 1/2 inch dice
- salt

- 1 cup husked and diced tomatillos
- 2 Serrano chiles, stemmed and chopped
- 1/2 large white onion, chopped
- 1 cup cilantro leaves
- 1/3 cup fresh lime juice (about 1 lime)
- 2 large ripe avocados, halved and pitted

- salt to taste

- 1 small Spanish onion, sliced thinly

- 12 small corn tortillas, warmed

1. Combine the first 6 ingredients in a large bowl and work with clean hands until all the meat and seasoning is combined. Cover and refrigerate for 24 hours.

2. Bring a medium pot of water to a boil, add salt and diced potatoes, and boil for about 5 minutes, until tender but not falling apart. Drain and set aside.

3. Make the salsa: In the bowl of a food processor, combine the tomatillos, chiles, white onion, cilantro, and lime juice, and pulse on and off a few times, scraping down sides of container as needed. Scoop the meat from the avocado halves into the processor bowl and pulse a few more times until the avocado is totally incorporated, but the salsa is not pureed. Season with salt and set aside in a bowl, with plastic wrap pressed onto the surface of the salsa to prevent browning.


4. Set a large skillet over medium-high heat and, when hot, add the chorizo mixture, breaking up vigorously with a wooden spoon. Once the chorizo is totally broken up and no longer raw, add the sliced onions, stir to incorporate, and cover. Let cook 5 minutes. Add the potato cubes, stir, and lower heat to medium, cooking for another 3-4 minutes.

5. Spoon the potato-chorizo mixture onto a warmed tortilla, and top with salsa. Enjoy with a good Mexican beer!

Thursday, June 24, 2010

Dressing Up the Egg: Mediterranean Frittata

Ahh, this is the time of year I love. The sun is shining, the days are long, the produce is plentiful - but it's sooooo hot! Especially in my sunbathed kitchen, after blasting the oven for 5 or 6 (who can remember?) straight hours in my quest for roasted chickpea snack perfection (this is my new little business venture, by the way). At least we have the ol' A/C unit whizzing and whirring away in the bedroom. Paying it a visit is like dipping the toes in ice water: it helps, but it's not as good as plunging right in. Anyway, I should have called it a day after my test kitchen adventures, but there was dinner to be had and special people to feed! Namely, Dan the Man and my friend Emily Case, who trudged from Brooklyn in this heat, a real trooper-lady. I made this festive frittata, inspired by a recipe (and lovely pictures) found on this sweet blog.


Mediterranean Frittata

(serves 10-12 as a nibble, 4-5 as a main dish)

7 eggs
1/2 cup milk
1/4 cup ricotta
1/4 cup grated pecorino
salt and fresh ground pepper

2 scallions, thinly sliced
1 cup spinach, washed, chopped, and wilted
1/2 cup kalamata or other oily black olive, pitted and chopped
zest of 1 lemon
3 cups cooked penne (whole wheat optional)

1 tbl. olive oil
1 tbl. butter

Preheat the oven to 350. Beat the eggs with the milk, cheeses, and s+p. Mix in the remaining ingredients, except the fats.

Place a large cast iron skillet over medium-high and heat the olive oil and butter, swirling to coat the bottom and sides. Pour the egg mixture in and lower the heat to medium. Cook untouched until the bottom and sides of the egg are firmed up (you can test this by separating the egg from the side of the skillet with a rubber spatula).

Place the skillet in the preheated oven and continue to cook for about 20 minutes, until the top is just firm. Remove the skillet from the oven and invert the frittata onto a plate. Then invert again onto another plate, or onto a cutting board, and cut into slices.


Wednesday, June 2, 2010

Fast and furious salmon

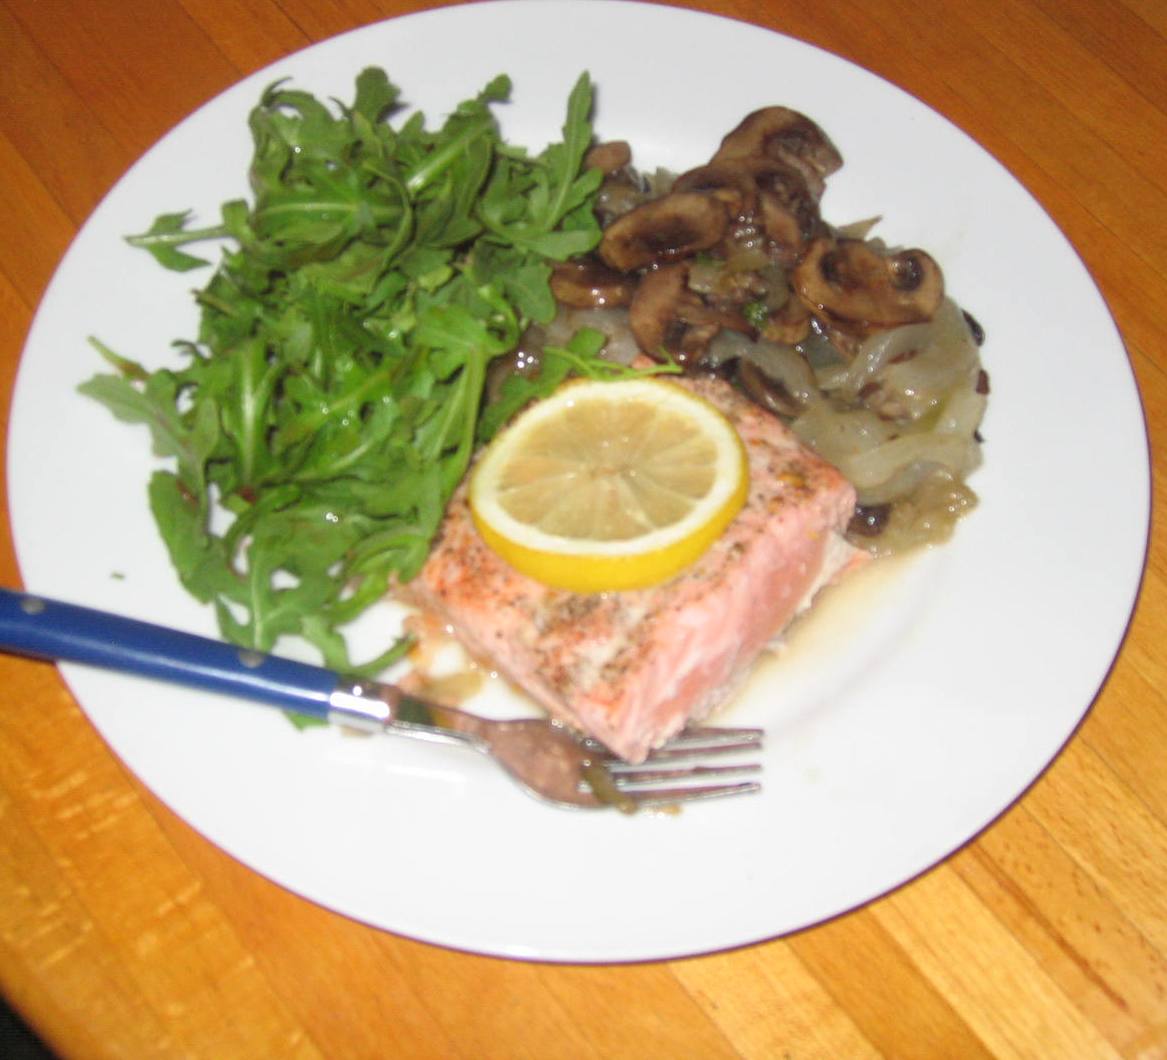
I'm sure I'm not the only one who is feeling burdened by this new summer heat. Nor am I the only one enticed to spend all her free time in the wonderfully cool, AC-equipped bedroom rather than in her sweaty, humid kitchen. Still, I couldn't imagine forfeiting my time in the kitchen just over some oppressive heat. And besides, we can easily reduce the time we spend in the kitchen by making simple, healthful dishes that don't require hours of lengthy prep or long, slow simmering to create. Hence the following dish that I whipped up for lunch yesterday. One pan, minimal prep, muy bueno!

Salmon fillet with mushrooms and onions
(serves 2)

- 1 large salmon fillet, skinless
- salt, freshly ground pepper, and red chili flakes to taste

- 1 tablespoon butter
- 1 tablespoon olive oil
- 1/2 large vidalia onion, chopped
- 1/2 lb. (about 1 cup) white mushrooms, cleaned, destemmed and sliced
- 3 dried red chiles, or 1 fresh red chile, destemmed
- 2 sprigs fresh oregano, thyme, marjoram, or za'atar (wild oregano - I used my windowsill plant), or 1 tsp. dried herb of choice
- 1 lemon

1. Rinse the salmon fillet and pat dry. Sprinkle generously with salt, pepper, and chili flakes, and set aside. Place oven rack on top shelf and turn on broiler.

2. Heat the butter and olive oil in a large oven-proof skillet over medium heat until melted. Add the onion and saute a few minutes, until they've softened a bit. Add the mushrooms and the whole chiles and continue cooking, lowering the heat to medium-low, until the mushrooms have released their liquid and the onions are transparent. Stir in the herb of your choosing.

3. Slice half of the lemon thinly and lay the slices on top of the salmon fillet. Raise the heat to high and clear a space in the skillet to slide the fillet in, making sure it makes contact with the skillet bottom.

4. Cook for about 4 minutes, or until the bottom and sides of the fillet are opaque. Remove the skillet from the stove and carefully place it on the top rack of the oven. Broil for about 5 to 10 minutes, depending on your desired temperature (I did 5 minutes for a perfect medium-rare).

5. When finished, carefully remove the skillet from the oven (beware, it will be very hot!) and squeeze the remaining half lemon all over. Discard the whole chiles and serve the salmon and vegetables alongside a simple arugula salad.

Wednesday, May 26, 2010

Sexy stracciatella

There is nothing sexier, in my opinion, than melted chocolate. And then to pour that deep, dark molten stuff into homemade vanilla frozen yogurt, made with the full-fat, tangy Greek stuff... well, that's definitely not for innocent eyes.

WARNING: Viewer discretion advised:

Vanilla Frozen Yogurt Stracciatella
(makes 1 quart)

3 cups Greek yogurt
3/4 cup sugar
1 teaspoon pure vanilla extract

4 oz. dark chocolate (I used the Green & Black espresso varietal, it is insane), melted

1. Mix the yogurt, sugar, and vanilla well, until the sugar is completely dissolved and the mixture is completely uniform. Refrigerate for 1 hour.
2. Churn in your ice-cream maker according to the instructions. When the frozen yogurt is just about finished, pour the melted chocolate in a steady, slow stream into the churning fro-yo. A liquid measuring cup does the job well.
3. Remove the frozen yogurt into the storage container and enjoy immediately, or store in the freezer until ready to enjoy.


It's positively sinful!

Saturday, May 22, 2010

Not your grandma's banana bread

I consider myself a skilled refrigerator forager, willing and able to make do with what its cubed confines provide me on any given lazy day.
On one such day, not too long ago, I dug out a couple of overripe bananas and a half-full container of sour cream from an earlier taco feast. With the knowledge that I had some walnut halves and dried coconut lingering in my pantry, I carried out the divine will of the leftover-food gods and made this:

Sour Cream Banana Bread
(makes one big loaf)

1-1/2 cup unbleached all-purpose flour
1/2 cup whole wheat flour
1 teaspoon salt
1-1/2 teaspoon baking powder
1 teaspoon ground cinnamon

2 ripe bananas
2 eggs
2 tablespoons canola oil
1 teaspoon pure vanilla extract
1/4 cup honey
1/2 cup sour cream
1/4 cup milk

1/4 cup walnuts, chopped
1/4 cup shredded unsweetened coconut

1. Preheat the oven to 350 degrees F and grease a 4 by 9 inch loaf pan (or whatever you have on hand). Sift together the first five ingredients in a large bowl.
2. In a medium bowl, mash the bananas with a fork until almost smooth. Using a wire whisk or an electric beater, beat in the eggs. Once combined, beat in the remaining wet ingredients until well combined.
3. Pour the wet ingredients into the dry ones and stir until just combined. Mix in the walnuts and coconut, and pour the batter into the loaf pan.
4. Bake for 1 hour, or until a toothpick inserted into the middle of the loaf comes out clean.